Telling the difference between a Mac OS X Restore Disc and a Retail Install Disc (Archive)

Note: This article was transferred from my original blog.


A lot more people have Macs today, which leads to a lot more people with a lot more questions. One frequent mix-up comes when a user needs to re-install Mac OS X or when someone wants to upgrade their copy of Mac OS X. Either they lose their discs or they decide to use one from a friend and they discover it just doesn’t work. They wonder why, that’s because not all discs will work with all Macs.

This happens because there are two common types of Mac OS X install discs. Three if you want to be specific. The first type is a Restore disc. These are gray-covered discs that come with your Mac when you buy it new. Usually there are two DVDs included, one has the Mac OS X software and the other has additional programs such as iLife. These discs will only work with that specific Mac model it was included with. For example a restore disc that came bundled with a MacBook will not work on an iMac. Or even a newer (2008) or older (2006) MacBook restore disc, may not work with your 2007 MacBook model.

The second type of a install disc is a Retail Install Disc. This is the type of disc you will buy from Apple. This is a full install disc and will work on any Mac that supports the minimum system requirements. It will install on an iMac, MacBook, Mac Pro, Mac Mini, etc. This version however does not include some bundled software that originally would of came with your Mac, such as iLife and some additional applications.

The third type of install disc is a variant of the Retail Install Disc, this is a Retail Upgrade Disc. These discs are usually received through Apple’s Up-To-Date program. You would receive this disc if you bought a Mac with the older software pre-installed on the system right after Apple has started shipping a newer version. For example if Mac OS X 10.5 came installed on your iMac and Apple released Mac OS X 10.6 a few days earlier, your iMac gets an upgrade. There may be a small charge to receive the updated discs. These discs will only install if it detects the older version of Mac OS X installed. For example it will not work on a Mac with no version of Mac OS X installed, or a version older then the previous version.

This can sound a bit confusing, but there is a simple way to tell the discs apart. A Restore disc has a gray cover and will say the model of the Mac it is for on the front along with a version number and a date. A Retail install disc will have a pretty graphic on the front and not mention a model such as iMac or MacBook. A Retail upgrade disc will look very similar to the Retail install disc, but it may say “CPU Drop-in DVD”, “Upgrade Disc” or “Update Disc” on it. This signifies that the install disc will check for a previous (and existing) installation of Mac OS X before it can install the updated version of the software, and will not work on a Mac that has no software on it.

So if you bought a new hard drive for your Mac and it’s blank, you will need a Retail install disc or the appropriate Restore disc for your Mac. An Upgrade disc will not work in this situation. Above is a graphic showing the difference between a restore disc and a retail install disc. I hope this helps with some confusion about the different Mac OS X install discs. Happy installing!!

-Steven

Garmin GPS Repair (Archive)

Note: This article was transferred from my original blog.


So my first GPS is a little black and white unit, tiny but, useful. A Street Pilot i2. I got it for just under $200 on Walmart’s online store during a Black Friday sale. It worked for many years and was very useful, guiding me home or from here to there even when I was lost.

Unfortunately it eventually died. Well, kinda. I lent the GPS to a friend and the unit fell from their dashboard with the DC car charger plugged into the fragile mini-USB port on the GPS. The mini-USB port is what you find on most digital cameras, it’s tiny and pretty fragile – especially if thrown around. So after the GPS took it’s tumble the only way to use the device was to plug in two AA sized batteries. This wasn’t so ideal since the batteries would be eaten up quickly and the GPS would then die.

Without a car charger long trips with the GPS were impossible. Thankfully by this time I had already purchased a Garmin Nuvi 200, which has a built-in rechargeable battery and a healthy  and spry USB port.

So while sitting at my desk yesterday, procrastinating about other, more important things I should be doing. I started to look at my once-working GPS, I was quite fond of it so I started to wonder if I could get it to work again. Previously I had opened up the GPS and noticed some of the pins on the mini-USB were not exactly touching the main circuit board, which would of course cause the unit not to charge or connect to the computer.

My soldering skills are okay, but even so, the tiny connector would be a big pain to try and fix and I’d probably end up splashing solder across all the 5 tiny pins, ruining any hope of getting it to work. So I thought of an alternative. The battery terminal that holds two AA batteries has a black and red wire. Conveniently Garmin has each wire labeled Positive (+) and Negative (-). So I thought of a standard USB cable, which also has red and black wires!

So I grabbed an old USB cable that broke off of a USB mouse years ago, I hung onto the cable for just this occasion. I wrapped the red and black cables around their appropriate counterparts on the battery bay, making sure the metal made a good enough contact to test if my idea would work. I plugged in the USB port using a generic USB AC adapter, I didn’t want to plug it into a computer – fearing that if I shorted something out it would damage the USB port of the computer… this has happened before in the past. So needless to say I was wary… but, I plugged it in… and it worked!!

The next step was figuring out how to make a detachable port and cable setup, so I can plug in the USB adapter to power it when needed, but still use the batteries if I wanted to. So I looked around in my bin of spare cables and found an original XBox controller extension cord. Since the XBox controller cable is basically a modified USB cable it would be perfect, besides, I’d only need to use two of the connections of a USB cable for the power. I wasn’t worrying about data at this point.

The cable I used is a cheap Xbox cable, you can find one used at any EB Games or GameStop store for $0.99 to $1.99. So I wasn’t too sad to splice up the cable and use it as I pleased. I soldered it to the battery terminals and ran the cable to the right side of the GPS, instead of making a fancy slot for the cable to come out of I just shoved the end of the soldering iron into the side of the plastic case of the GPS, melting a hole for cable to come out of. Yes, very “professional” I know, but it was better then hacking away at the plastic with a pair of scissors. So now the female plug of the XBox controller extension cable is now coming out of the GPS, next I soldered the other end of the cable to a standard USB A type connector.

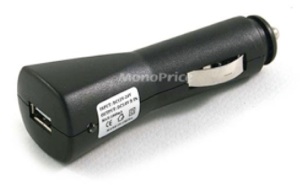
Now all I needed to do was plug the standard USB A connector into the car charger adapter, I got it off Monoprice.com for 97 cents! How can you beat that? it’s a generic USB charging adapter for the car. Next it was off to my car to test if everything worked out. I plugged in the USB cable, plugged the adapter into the cigarette outlet on the car and turned the key in the ignition to accessory. I pressed the power button on the GPS unit. The GPS beeped happily, turning on from a power source other then two batteries for the first time in years! It works great, and the power cable doesn’t interfere with the battery bay, meaning I can still use AA batteries if I had to. However I wouldn’t want to use both at the same time, that would probably damage something… or at least cause something to blow up and spark.

Anyway this was a successful and I hope this post may be helpful in the future to anyone who has a similar problem… yes that’s a bit far-fetched but you never know! 🙂

-Steven